Fail2ban is an tool used to improve server security from cyber attacks. It allows you to block remote ip addresses temporary or permanently based on defined settings. It helps you to secure your server and data from attackers.
This tutorial help you to install Fail2ban on a Ubuntu 20.04 LTS Linux systems. Also provides you initial configuration with protect SSL using fail2ban.
You must have shell access to Ubuntu 20.04 system with sudo privileged account.
Fail2ban Debian packages are available under the default apt repositories. You just need to update Apt cache and install fail2ban debian package on your system.
Open a terminal and type:
sudo apt updatesudo apt install fail2ban -y
After successful installation, make sure service is started.
sudo systemctl status fail2ban
Make sure service is active and running.
Fail2ban keeps configuration files under /etc/fail2ban directory. The jail.conf file contains a basic configuration that you can use to create a new configuration. Fail2ban uses a separate jail.local file as configuration to avoid updates of jail.conf during packages updates.
So create a copy of the configuration file with name jail.local:
sudo cp /etc/fail2ban/jail.conf /etc/fail2ban/jail.local
Next edit jail.local configuration file in a text editor.
sudo vim /etc/fail2ban/jail.local
Update the initial settings under the [DEFAULT] section.
[DEFAULT]

ignoreip = 127.0.0.1/8 192.168.1.0/24
bantime = 60m
findtime = 5m
maxretry = 5
In the next section, you can secure the system services to
After completing default configuration, go down in the same file jail.local and update [ssh-iptables] section as below.
[ssh-iptables]

enabled  = true
filter   = sshd
action   = iptables[name=SSH, port=22, protocol=tcp]
           sendmail-whois[name=SSH, dest=root, sender=info@example.com, sendername="Fail2Ban"]
logpath  = /var/log/secure
maxretry = 3
Let’s protect your FTP (vsFTPd) server, Find the below entry of [vsftpd-iptables] section and make changes as below. If you are not using vsFTPd, you can skip this section.
[vsftpd-iptables]

enabled  = true
filter   = vsftpd
action   = iptables[name=VSFTPD, port=21, protocol=tcp]
           sendmail-whois[name=VSFTPD, dest=you@example.com]
logpath  = /var/log/vsftpd.log
maxretry = 5
bantime  = 1800
After making all the changes save your file and restart Fail2ban service using the following command.
sudo systemctl restart fail2ban.servicesudo systemctl enable fail2ban.service
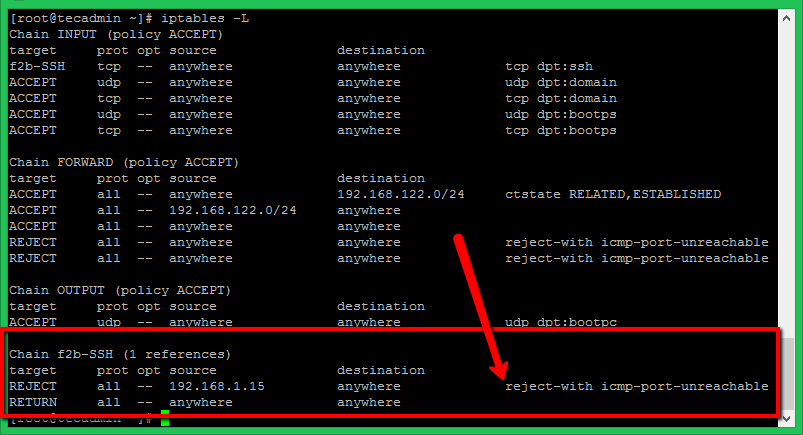
For testing purposes, I have tried SSH with the wrong credentials from a different machine. After three wrong attempts, Fail2ban blocked that IP via iptables with reject ICMP. You can see the rules in iptables after blocking the IP address as below. For SSH only systems, make sure to have SSH access from another IP before making these tests.
This tutorial helped you to install and configure Fail2ban on Ubuntu 20.04 LTS system. Additioally provided you the configuration details to secure specific services like SSH, SFTP and FTP.
The post How to Install and Configure Fail2ban on Ubuntu 20.04 appeared first on TecAdmin.
Previously I have written about how useful public cloud storage can be when starting a…
This is Part 2 of the "Karafka to Async Journey" series. Part 1 covered WaterDrop's…
For many software teams, documentation is written after features are built and design decisions have…
With the release of the FIPS 140-3 certified cryptographic modules for Ubuntu 22.04 LTS, Canonical…
Open source libraries are repositories of code that developers can use and, depending on the…
Last year, we had the opportunity to speak at Regent’s UX Conference (Regent’s University London’s…