
Quagga is one of the major open source projects used to provide routing services on the Linux platform. It consists of different components for different dynamics protocols such as open the shortest path first (OSPF), Routing information protocol (REST IN PEACE), Border Gateway Protocol (BGP), Intermediate system to intermediate system (IS-IS) and Multi-protocol label switching (MPLS). In some cases it offers the same virtual terminal or CLI (vty / vtysh) as CISCO / JUNIPER for the configuration of protocols.
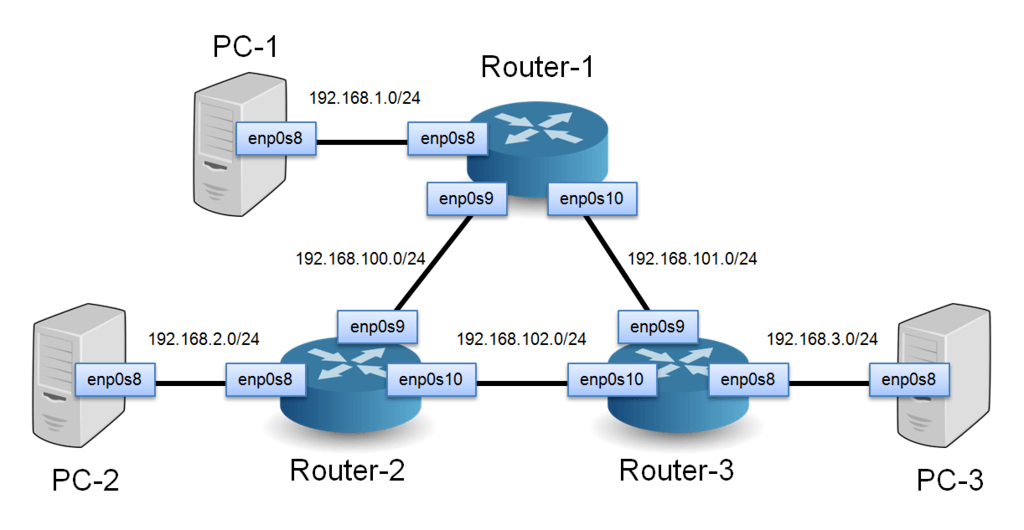
In this article we are going to install the Quagga routing suite on the Ubuntu platform. Details about our VM are shown below.
installation
Quagga can be installed from source, but in this article we will be installing the Deb / Binary package.
Run the following command to check the Qugaaga package dependencies.
#apt-cache depends quagga
The output of the above command is shown below.
Run the following command to install the Qugaaga routing software.
#apt-get install quagga
The installation of the Quagga package is shown in the following figure.
construction
The default configuration of Linux-based devices does not support packet forwarding until some kernel parameters are enabled.
Enable packet forwarding for IPv4 using the following commands shown in the figure. The setting is saved permanently in the /etc/sysctl.conf file.
$echo "net.ipv4.conf.all.forwarding=1" | sudo tee -a /etc/sysctl.conf
$echo "net.ipv4.conf.default.forwarding=1" | sudo tee -a /etc/sysctl.conf
 $sudo sysctl -p
Now that we’ve activated packet forwarding, let’s configure the Quagga routing software to run on Linux. The following configuration is required to run the Quagga daemon on Ubuntu.
babeld.conf
bgpd.conf
bgpd.conf
isisd.conf
ospf6d.conf
ospfd.conf
ripd.conf
ripngd.conf
vtysh.conf
zebra.conf
The user can create these configuration files or copy these example files from / usr / share / doc / quagga / examples / path to the /etc/quagga/*.conf path.
Copying sample files to / etc / quagga / path is shown in the following figure.
Rename the sample files after copying them to the / etc / quagga directory.
test@test-machine:/etc/quagga$ sudo mv babeld.conf.sample babeld.conf
test@test-machine:/etc/quagga$ sudo mv isisd.conf.sample isisd.conf
test@test-machine:/etc/quagga$ sudo mv ospfd.conf.sample ospfd.conf
test@test-machine:/etc/quagga$ sudo mv ripngd.conf.sample ripngd.conf
test@test-machine:/etc/quagga$ sudo mv zebra.conf.sample zebra.conf
test@test-machine:/etc/quagga$ sudo mv bgpd.conf.sample bgpd.conf
test@test-machine:/etc/quagga$ sudo mv ospf6d.conf.sample ospf6d.conf
test@test-machine:/etc/quagga$ sudo mv ripd.conf.sample ripd.conf
test@test-machine:/etc/quagga$ sudo mv vtysh.conf.sample vtysh.conf
The Quagga daemon, which runs under the user quagga, therefore changes ownership and permissions on configuration files. The quagga user is created in Ubuntu during package installation.
Run the following commands in the / etc / quagga folder to change ownership and permissions.
$sudo chown quagga:quagga *
The “640” authorization is already set for the files.
In the end, we have to enable or disable various Quagga daemons. The Zebra daemon is the core component of the routing suite and must therefore be activated in the / etc / quagga / daemons file. This article only enables the OSPF and RIP dynamic protocol daemons in the file.
The default configuration of the daemons file is shown in the following snapshot. All routing daemons are disabled in the default configuration file.
The configuration file with OSPF and RIP enabled is shown below.
Various daemons of the Quagga suite run on the TCP protocol and the monitoring ports will be from 2600-2800.
test@test-machine:/etc/quagga$ cat /etc/services | grep zebra

zebrasrv       2600/tcp      # zebra service
zebra             2601/tcp      # zebra vty
ripd               2602/tcp      # ripd vty (zebra)
ripngd           2603/tcp      # ripngd vty (zebra)
ospfd             2604/tcp      # ospfd vty (zebra)
bgpd              2605/tcp      # bgpd vty (zebra)
ospf6d           2606/tcp      # ospf6d vty (zebra)
isisd               2608/tcp     # ISISd vty (zebra)
Start the Quagga routing suite with the following command.
$sudo /etc/init.d/quagga restart
We can use the netstat command to confirm the successful execution of daemons.
$sudo netstat -antp | grep 260
Quagga routing can be configured in the following way.
vtysh

telnet (telnet 127.0.0.1 ospfd/ripd/bgpd/zebra)
vtysh provides a central location for the configuration of all daemons. Enter the following command in the terminal to start the virtual shell (vtysh) for the Quagga configuration
$sudo vtysh
Zebra, ospfd and ripd can be configured with vtysh.
The daemons configuration with the telnet command is shown in the following figures.
Zebra demon
$telnet localhost zebra
Ospfd daemon
$telnet localhost ospfd
Rippd daemon
$telnet localhost ripd
diploma
The Quagga routing suite is mainly used on Linux platforms to perform dynamic routing. In this article we learned how to install, configure and use the Quagga Routing Suite. It supports several ways to configure routing protocols like OSPF and RIP. Quagga-based routing devices can be used for small and medium-sized businesses (SMB).